Get started with private videos
This article explains how to secure and limit access to videos.
Secure & manage access to your videos
Maybe you are asking yourself: "ok, but how does video privacy help me?". There are quite a few use cases for private videos, and we’ve discussed the hassle of securing the videos yourself.
- On-demand videos behind a paywall
- Content Protection
- Video NFTs
- Video for internal use only
- Private video messaging
- Disposable one-time videos
And pretty much any video where you want to limit or restrict access!
What are private videos?
A private video is a video object secured by a private token and can be consumed only once. After the private token is consumed, the video is only available once you have another private token assigned to it. So, even if your user has the video URL, sharing it with anyone else is useless.
We tried to make it as simple as possible to secure your videos:
- Create a video container with a
public: falseflag, which will make the video private! - Private videos will generate a new private token each time a request is made for that video id.
- Each private token is usable only once.
If you like to get into nitty gritty details, feel free to check out all the other pages about Private Videos.
How to deliver private videos to your audience
After you learn how private video works and what it’s good for, we can now talk about the delivery part, which is the most important part.
To reiterate the private video concept, here’s a visual representation of how the whole thing works:


Knowing that now we can finally start building stuff!
It’s that simple! (if you want the advanced stuff, scroll down to "Time to roll up our sleeves!")
Let’s try to deliver one video in HTML with our own (amazing!) api.video player.
Suppose you already have a cool video uploaded. Go to the dashboard and get make the video private (if it’s not already private):
Visit the Videos page in the dashboard.
Locate the video that you want to set to private, and click on Video Details.
On the video details page, select the Details tab and scroll down to the Settings section. You'll see Viewing Options and the Public property here.
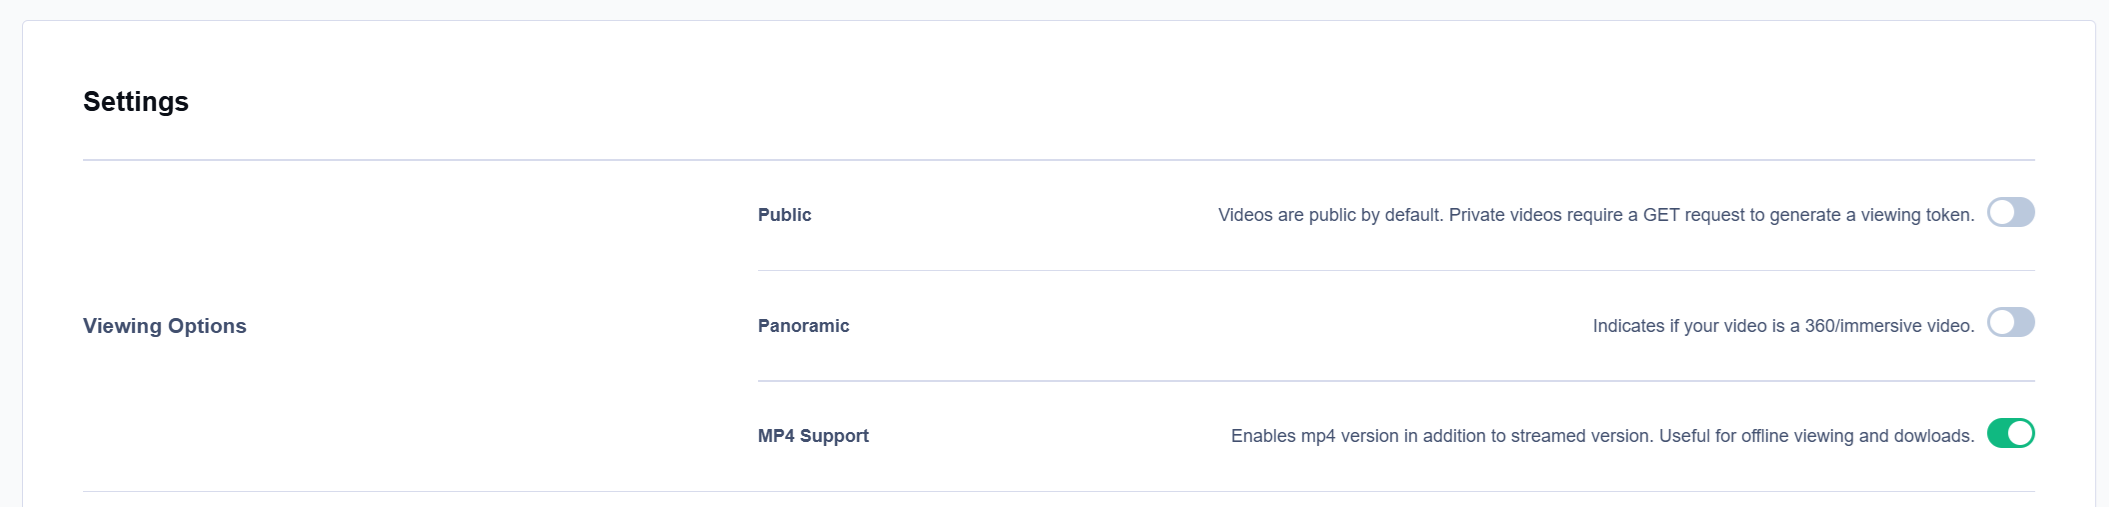
Toggle the Public property off to set the video to private.
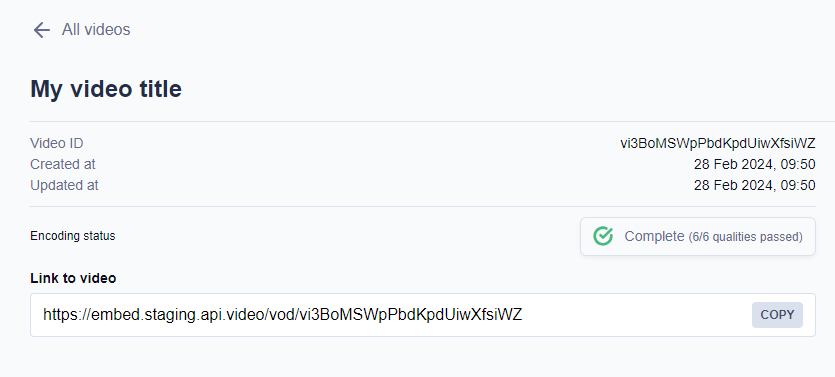
Now that the video is private, we can deliver it to users. You can find the video URLs in the Assets section of the Video Details:
Here’s a quick snippet in HTML that you can use to embed your video in the browser. Just copy the code snippet and replace the URL with your private video URL.
<html>
  <head>
  </head>
  <body>
    <video height="30%" width="30%" controls>
        <source src='https://embed.api.video/vod/{video id}?token={private token}'>
    </video>
  </body>
</html>
We played the video once with a browser. Now, open another browser tab in incognito mode and play the same video. You can see that it’s gone! no more video! don’t worry; even though the video still exists, the token changes once you consume it. If you refresh the video details page, you’ll notice that the private token has changed. If you paste the URL with the new private token in the src you will be able to play the video again in a new tab, but already with a different private token. Cool right?
Let’s get programmable
The concept works the same for API requests. You can request the API and fetch the video by id; if it’s a private video the response will give you the URLs with the private tokens (the XYZ in the URLs stands for the private token):
curl --request GET \
     --url https://ws.api.video/videos/ABC \
     --header 'accept: application/json' \
     --user 'your_api_key:'
{
"videoId": "ABC",
"title": "test video",
"description": "something that I wanted to share",
"public": false,
"panoramic": false,
"mp4Support": true,
"publishedAt": "2023-01-19T10:19:19+00:00",
"createdAt": "2023-01-19T10:19:19+00:00",
"updatedAt": "2023-01-26T16:55:41+00:00",
"tags": [],
"metadata": [],
"source": {
"type": "upload",
"uri": "/videos/ABC/source"
},
"assets": {
"iframe": "<iframe src=\"https://embed.api.video/vod/ABC?token=XYZ\" width=\"100%\" height=\"100%\" frameborder=\"0\" scrolling=\"no\" allowfullscreen=\"true\"></iframe>",
"player": "https://embed.api.video/vod/ABC?token=XYZ",
"hls": "https://vod.api.video/vod/ABC/token/XYZ/hls/manifest.m3u8",
"thumbnail": "https://vod.api.video/vod/ABC/token/XYZ/thumbnail.jpg",
"mp4": "https://vod.api.video/vod/ABC/token/XYZ/mp4/source.mp4"
}
}Assets? What assets?
Notice that JSON above has a field called assets. We’ll refer to assets later, but it’s important to know what they are. Assets include the URLs for the video thumbnail, iframe with the api.video player for embedding directly into the HTML, and several other video formats like mp4 and hls. Now you know!
How to create a sample app with private videos
Now that we know the privacy setting concepts, it’s time to write some example apps that will give us a small glimpse into what powerful tool we are dealing with here.
Let’s assume that we want to build an app that will display all the private video thumbnails on our website and make them clickable so it will open a video once it’s clicked. Something like that:
On the backend, we will have to do some magic. While with public videos it’s pretty simple as just returning the videos, for private videos we will need to get the session first. Let’s look at the HTML code:
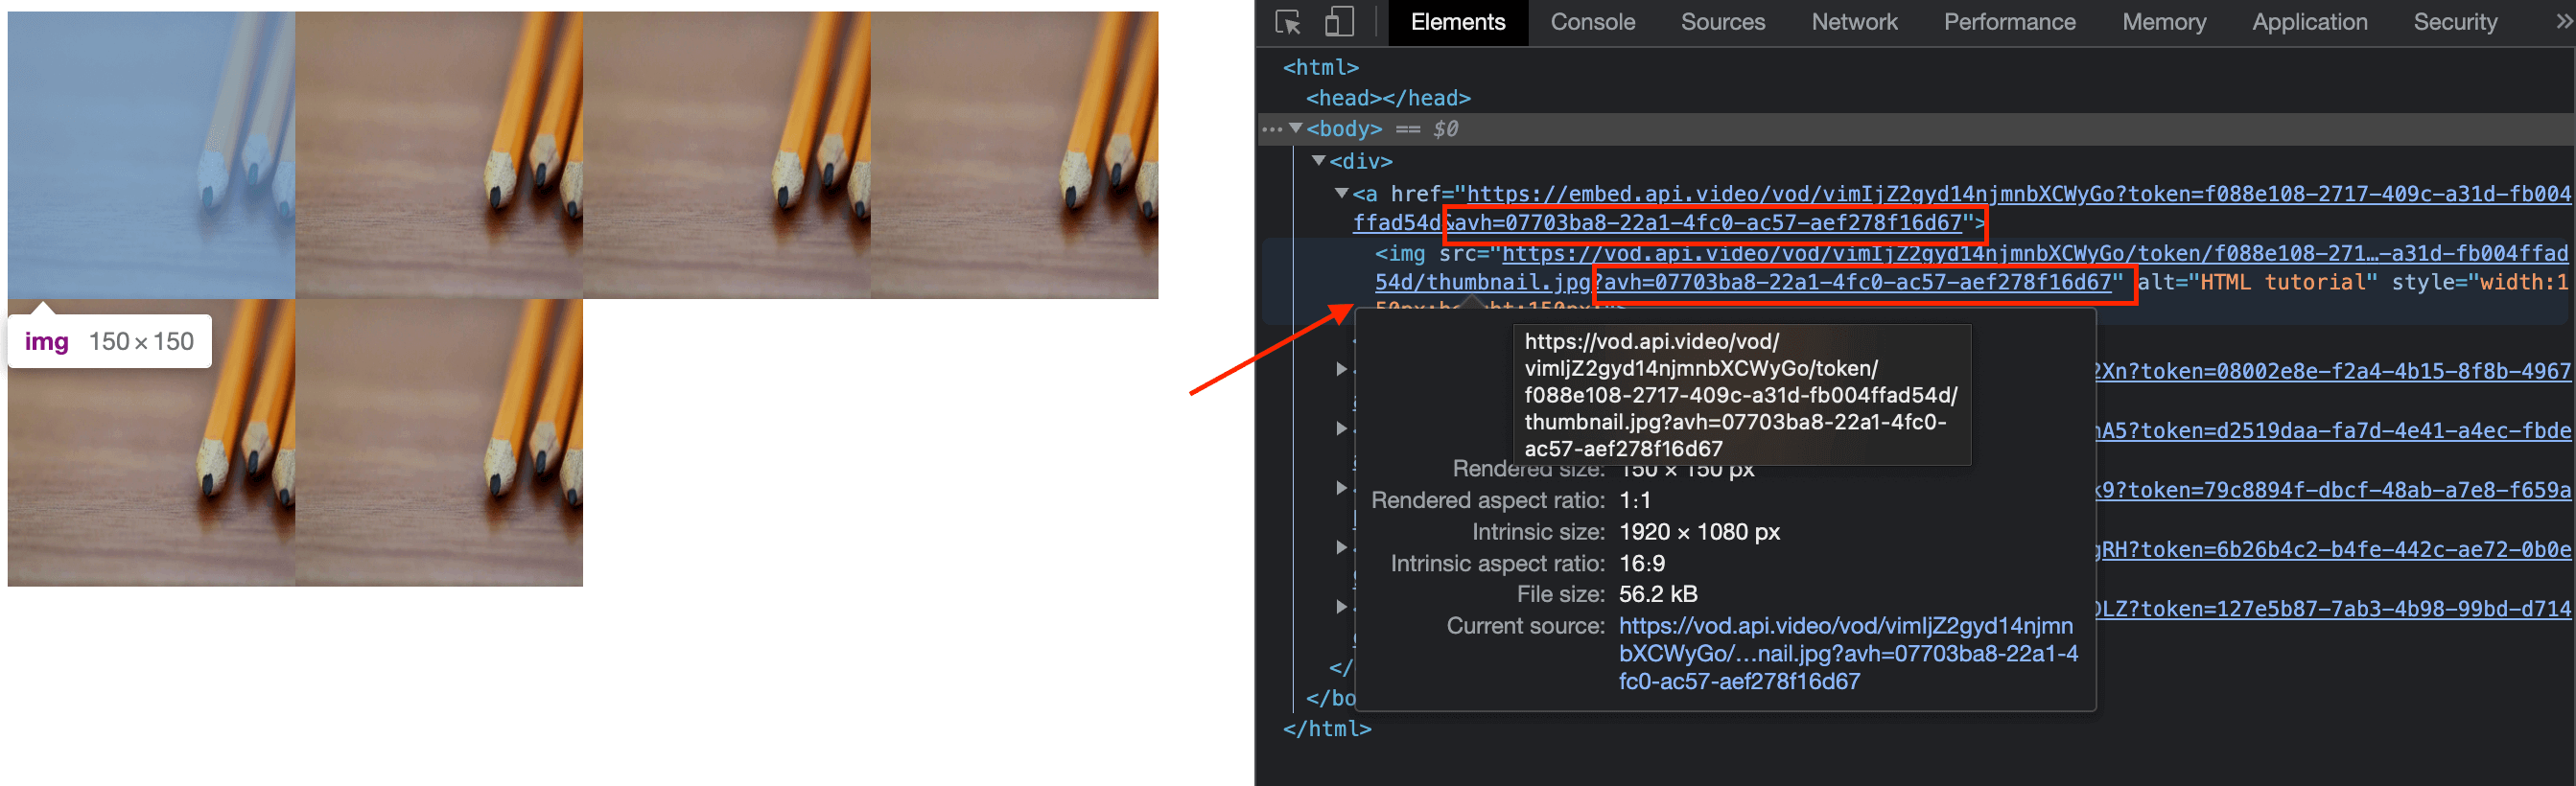
Notice the avh parameter in the query string? The avh parameter is where you will pass the session token... oh wait, what's a session token?!
Session token & session management
Session Tokens are designed to retain the same session for a user. Let’s take an example - a user opened a tab with the private video and would like to refresh the tab, or the video didn’t work with our player for whatever reason. Hence, you redirect the user to an mp4 version of that video (different asset). For these cases, we’ve created the session tokens.
There are two types of tokens for private videos:
- Private token (which we already discussed): generated every time you pull a private video from the API.
- Session token: This token is used to retain the private video session with the same private token.
At a very high level, to request different assets for the same private video, more than having the private token is required; you also need to retain the session. For that, we have the session token. In the flowchart below, you can see that for each private video, we are using a session token + the private token:

So let’s get a bit technical here. To start the session, you will need to request the /session endpoint, get the session token, add it to the first asset you request, and then add it to every following asset you request. In the example above, we will request the /session endpoint, then add the session token to the query string of the private video thumbnail → request an embedded video asset with the session token in the query string → request a private video asset in mp4 format with the session token, and so on, you get the idea.
In other words:
Get the session token:
GET https://vod.api.video/vod/{videoId}/token/{private token}/sessionResponse:
{"session_token": "111-222-333"}Now we can request the private video thumbnail asset → embedded video → mp4:
GET https://vod.api.video/vod/{video id}/token/{private token}/thumbnail.jpg?avh={session token}GET https://embed.api.video/vod/{video id}?token={private token}&avh={session token}GET https://vod.api.video/vod/{video id}/token/{private token}/mp4/source.mp4?avh={session token}Check out a sample runnable code of the above app in Node.js using Replit.
Let’s do a step-by-step review of what we are doing here.
- We are creating a server that will serve HTML on port 3000 with Node.js
- To make it easy on ourselves, we create a wrapper that will make an HTTP request to api.video with api key already embedded in HTTP header. That’s the
apiVideoReqfunction. - We will get a raw response from the apiVideoReq, so need to create a parser that will parse the JSON response if the request is successful (200). That’s going to be the
getJsonResponse - Then we need to create a function that will get the list of our videos. That’s pretty simple with the wrapper function we have, so let’s reuse the
apiVideoReqand make a request to thevideosendpoint. You can find more info about the/videosendpoint here. The response we'll get is an array of objects of the following format:
{
  "data": [
    {
      "videoId": "XXYYZZ",
      "title": "test",
      "description": "",
      "public": true,
      "panoramic": false,
      "mp4Support": true,
      "publishedAt": "2023-01-17T10:41:51+00:00",
      "createdAt": "2023-01-17T10:41:51+00:00",
      "updatedAt": "2023-01-17T10:41:51+00:00",
      "tags": [],
      "metadata": [],
      "source": {
        "type": "upload",
        "uri": "/videos/XXYYZZ/source"
      },
      "assets": {
        "iframe": "<iframe src=\"https://embed.api.video/vod/vi4DemYYVCTQdpYJ4Zq7KaT9\" width=\"100%\" height=\"100%\" frameborder=\"0\" scrolling=\"no\" allowfullscreen=\"true\"></iframe>",
        "player": "https://embed.api.video/vod/XXYYZZ",
        "hls": "https://vod.api.video/vod/XXYYZZ/hls/manifest.m3u8",
        "thumbnail": "https://vod.api.video/vod/XXYYZZ/thumbnail.jpg",
        "mp4": "https://vod.api.video/vod/XXYYZZ/mp4/source.mp4"
      }
    },
		{
      "videoId": "AABBCC",
      "title": "test video",
      "description": "something that I wanted to share",
      "public": false,
      "panoramic": false,
      "mp4Support": true,
      "publishedAt": "2023-01-19T10:14:05+00:00",
      "createdAt": "2023-01-19T10:14:05+00:00",
      "updatedAt": "2023-02-09T18:27:06+00:00",
      "tags": [],
      "metadata": [],
      "source": {
        "type": "upload",
        "uri": "/videos/AABBCC/source"
      },
      "assets": {
        "iframe": "<iframe src=\"https://embed.api.video/vod/AABBCC?token=c77d7bf3-4e2f-4a85-9e15-5c35992c11fc\" width=\"100%\" height=\"100%\" frameborder=\"0\" scrolling=\"no\" allowfullscreen=\"true\"></iframe>",
        "player": "https://embed.api.video/vod/AABBCC?token=c77d7bf3-4e2f-4a85-9e15-5c35992c11fc",
        "hls": "https://vod.api.video/vod/AABBCC/token/c77d7bf3-4e2f-4a85-9e15-5c35992c11fc/hls/manifest.m3u8",
        "thumbnail": "https://vod.api.video/vod/AABBCC/token/c77d7bf3-4e2f-4a85-9e15-5c35992c11fc/thumbnail.jpg",
        "mp4": "https://vod.api.video/vod/AABBCC/token/c77d7bf3-4e2f-4a85-9e15-5c35992c11fc/mp4/source.mp4"
      }
    },
	]
}
Notice that the second object has a property public which is set to false , which means that the video is private; hence we need to get all of these videos.
- Extract all the private videos from the list by creating an iterator that will run through the array of objects and get each video with the flag
publicset tofalsepushing only the assets and video id into a new array. - If you remember, we need to get the session token by requesting the /session endpoint. The endpoint accepts the video id and private token; however, if you notice the private token is only in the URL. So let’s extract it! we can use this simple regex to extract it from the embedded URL
(?<=token=).*$ - We first extract the private token from the URL and map it to the asset objects (with the video URL, video id, etc.)
- Then we request the /session endpoint passing in the video id and private token, and we get the session_token. Now we can also map to the same asset object.
- We’re almost done; hang in there! now let’s get generate
<img>tags with the src as the asset thumbnails and add the session token in the query string as anavhparameter, i.e:<img src=https://vod.api.video/vod/AABBCC/token/c77d7bf3-4e2f-4a85-9e15-5c35992c11fc/thumbnail.jpg?avh={{session token}}>. Then in the same line generate the<a href>tag that will lead us to the actual video, and as you understood already, it too has to include the session token, i.e:<a href=https://embed.api.video/vod/AABBCC?token=c77d7bf3-4e2f-4a85-9e15-5c35992c11fc&avh={{session token}}> - And lastly, generate the HTML
<head>and<body>while encapsulating the<a href><img></a>we’ve already created, and…. DONE!
Now you have clickable thumbnails of your private videos which you can secure behind user credentials for example.
Let’s summarize what we’ve learned here:
- We’ve understood how private videos work and the purpose of private videos with real-life use cases.
- We’ve also built a small app to leverage private videos to create clickable thumbnails with minimal code.
If you have any questions or feedback about this article, do not hesitate to contact our support.